Drivers For Iatkos El
Drivers For Iatkos El Rating: 4,7/5 2054votes

OSx86.net - A database of official and unofficial Mac OS X drivers (kexts) from the Dutch Hackintosh community. OS X El Capitan Compatible Notebooks - A well-researched article on top notebooks from Acer, Asus, HP, and Lenovo that are largely compatible with OS X El Capitan. OS X Mavericks Compatible Notebooks - A. Universal driver for Mac OS X 10.x.x.Only one driver for many Wireless USB Adapters on the chip RealtekThe package includes:1.RtWlanU.kext2.Wireless Network.
If you're interested in running Mac OS X, but you don't want to pay ridiculous prices for a normal Mac, then a just might be for you. Right now, the newest iteration of OS X is 10.8, known as Mountain Lion. In this guide, we'll show you how to install Mountain Lion on your PC with the iAtkos distro. We've previously covered how to, which requires you to have an existing Mac OS X installation. This usually means that you have to install Snow Leopard on your PC first, or find a real Mac. However, with a 'distro' like iAtkos, you can jump straight to Mountain Lion. Distros are pirated copies of Mac OS X that have been modified to work with a PC.
If you don't have any qualms with the legal issues regarding distros, they're actually the most convenient way to set up a Hackintosh. Requirements: • An existing Windows computer/Mac/Hackintosh: This is the computer where you will download and set up iAtkos. Either Windows or Mac OS X will work. If you're using a Windows computer, it needs to have a DVD/Bluray burner (just about every DVD/Bluray drive nowadays can act as a burner, too).
• A Hackintosh-compatible computer with 10 GB+ of free space: This is the computer where you will install OS X Mountain Lion. It can be the same computer as the one mentioned in the previous point. If your computer already has Mac OS X Lion installed, iAtkos will just update Lion to Mountain Lion normally, without deleting any of your apps or files. However, not every computer will work with Mac OS X. Be sure to read the very carefully, to check whether or not your computer qualifies. Also, OS X Mountain Lion takes up about 10 GB of space on its initial installation, so the computer where you install Mac OS X must have at least 10 GB of space in its hard drive.
However, that's only the bare minimum; if you plan to install Mac OS X for day-to-day use, I recommend allocating at least 50 GB of space. It's preferred that you use a completely empty hard drive for this, but if your computer already has Windows installed on your hard drive, be sure to create an appropriate hard disk partition for OS X Mountain Lion beforehand (by following ). • iAtkos ML2 (Free): iAtkos is by far the most popular distro of OS X Mountain Lion. I won't go into details, but you can download it from just about any bittorrent website (it's about 5 GB in size). The requires you to modify a retail copy of OS X Mountain Lion with Unibeast, but iAtkos already does all of this for you. In this guide, you will write iAtkos onto a USB drive or DVD, and boot your computer from iAtkos to install Mac OS X. This guide describes how to install iAtkos ML2.
You can also use iAtkos ML3, an updated version that only works with. If you're not sure which version to use, just use ML2. • A dual-layer DVD, Bluray disc, or empty USB drive (8 GB or larger): If you are setting up iAtkos from Windows, you have to write iAtkos onto a dual-layer DVD or Bluray disc (normal DVDs don't work because iAtkos is slightly too large). However, if you're setting up iAtkos from Mac OS X, you can use a 8 GB or larger USB drive instead of a dual-layer DVD. You will need to erase all of the files on your USB drive beforehand, so make sure to back up its contents first. You can reuse this USB drive for normal stuff after you finish installing Mountain Lion. You cannot write iAtkos onto a USB drive from a Windows computer. If you really want to use a USB drive from Windows, and set up an iAtkos USB drive on there instead. Be sure to install the to view USB drives from your virtual machine.
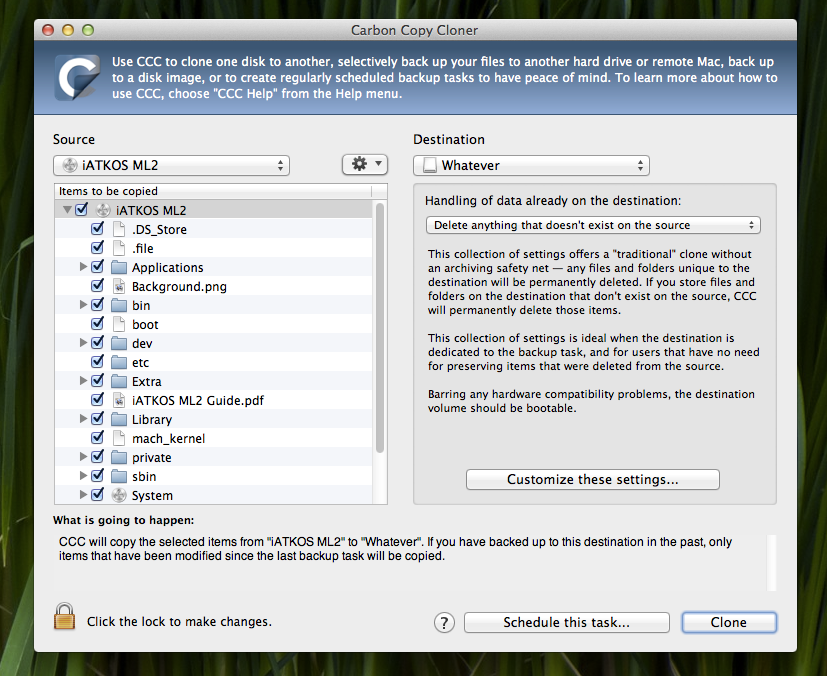
• ($48, 2-week free trial): If you're using a Windows computer to set up iAtkos, you need to use TransMac to write ('burn') the iAtkos disk image file onto your dual-layer DVD or Bluray disc. You don't actually need to purchase TransMac; the free trial works fine. • ($40, 2-week free trial): If you're using a Mac to set up iAtkos, you need to use Carbon Copy Cloner to write the iAtkos disk image file onto your USB drive.
You don't need to actually purchase Carbon Copy Cloner; the free trial works fine. • (Free): Multibeast is a collection of that your Hackintosh will need to run properly, after the initial installation. If you're using a Mac to set up iAtkos, you will also need Multibeast before the initial installation.
Be sure to download the newest version 5 of Multibeast, not the older versions 3 or 4 (which are for Snow Leopard and Lion, respectively). Create your iAtkos USB drive (Mac).
This process may take up to an hour (or more, depending on the speed of your DVD burner). Once TransMac finishes, you will have a fully bootable DVD version of the iAtkos Mountain Lion installer. 2. Set up the parts of your PC I covered these steps in, but they're worth mentioning again: • Unplug all USB-connected devices from your computer before you begin the setup (except your keyboard and mouse).
A faulty external USB hard drive can cause your Hackintosh bootloader to give you EBIOS errors on startup. • Open up your computer and unplug any extra internal hard drives that your computer has, besides the hard drive that you're installing OS X on. (Just unplug the hard drive SATA cables from your motherboard.) • If possible, connect your monitor to the DVI port of your computer's graphics.
The Mac OS X installer sometimes has problems with HDMI and VGA. NOTE: If you're installing Mac OS X on a computer that already has Windows installed, you may have to beforehand. Otherwise, Windows won't boot afterwards. Also, after installing Mac OS X, you should also. Set up your motherboard's BIOS The BIOS is basically a settings page for your motherboard.
To enter the BIOS on my own computer's Gigabyte P67A-D3-B3 motherboard, I have to press the delete key when it boots (before the operating system starts). Different manufacturers set different keys for opening the BIOS. NOTE: If you have a newer Gigabyte motherboard that uses the UEFI interface instead of BIOS, check out instead. If your Hackintosh doesn't have Snow Leopard or Lion installed yet, you have to change a few extra BIOS settings.
Before starting, reset all of your BIOS settings to their factory defaults. On Gigabyte motherboards, you can reset your BIOS settings to their default by selecting 'Load Optimized Defaults' on the main page of the BIOS.
Once your BIOS is running on its defaults, you need to change these three settings: Boot Device - If you're using an iAtkos USB drive, change the boot device of your computer so that 'USB-HDD' is first. If you're using an iAtkos DVD, change 'CDROM' to first. You need to do this for iAtkos to work.
After you finish installing Mac OS X, you should change this setting back to default, so that 'Hard Disk' is the first boot device (this optional, but it will speed up your boot times). Keep in mind that the BIOS on most motherboards do not support using a mouse, so you'll probably have to navigate through the BIOS with the arrow keys on your keyboard. Press 'Enter' to change a selected option in the BIOS.
On my Gigabyte motherboard, I have to press F10 to save my changes. Boot into iAtkos Plug your iAtkos USB drive into a USB 2.0 port on your computer (USB 3.0 doesn't always work), or insert your iAtkos DVD into your DVD drive. Restart your computer. If things go well, your computer will boot into iAtkos instead of booting from your normal hard disk.
You will then be able to view the iAtkos menu. In the worst case scenarios, instead of loading the Mac OS X installer, you may end up at a dark gray screen that tells you to restart your computer (a kernel panic), or you may end up with a small crossed-out sign (a loading error). If you get a kernel panic/loading error (or if the Mac OS X installer simply won't start within 10 minutes), you'll need to enter some boot flags.
To enter boot flags, manually restart your computer by pressing your computer's power button. Then, once you've booted back into the iAtkos menu, try before pressing the enter/return key. Check out this list of for reference ( PCIRootUID=0 and -x are two popular boot flags). You need to use Disk Utility to erase a hard drive partition so that OS X Mountain Lion can install itself on it. In the sidebar of Disk Utility, choose the hard drive partition where you want Mountain Lion installed, and erase it by using the 'Erase' tab. You can also just erase the entire hard drive (this is the preferred solution if you don't plan to dual-boot Windows and Mac OS X from the same hard drive).
In the screenshot below, my hard drive partition is called 'disk0s2', while my entire hard drive is called '21.47 GB VBOX HARDDRIVE'. When erasing, the format should be set to 'Mac OS Extended (Journaled)'. You can also partition the hard disk by using Disk Utility's Partition tab. NOTES: • Mac OS X cannot boot from a partition that's larger than 1 TB in size, so if you have a 2 TB hard drive, you will have to partition it. • Unlike the default OS X Mountain Lion installer, the iAtkos version of the Mountain Lion installer works with by default. If your hard disk uses the MBR partition scheme, iAtkos will install itself onto there without the need for prior modifications. • The iAtkos version of the Mountain Lion installer also works with by default. If you want to set up your Hackintosh's hard disks in a RAID 0 array, simply create an array by using the Disk Utility app inside the iAtkos installer (see ).
IAtkos will install itself onto there without the need for. On the installation page for Mac OSX, the hard disk/disk partition should now be showing up. Select it, and then click the 'Customize' button on the bottom left. This is where using a distro becomes really useful: iAtkos allows you to install extra Hackintosh drivers and, straight from the OS X Mountain Lion installer. The 'Customize' page essentially does the same thing as, though the layout (and most of the names of the options) are different. However, choosing the right options from this page can be really tricky, so unless you're absolutely certain about which drivers and kexts you need to install for your computer, I don't recommend installing too much stuff from here.
The default selection will enable Mac OS X to boot from the hard drive without any assistance; it may also enable sound and ethernet in OS X. For most computers, that will be enough (at least for the initial installation). If you wish to install more, refer to our. Otherwise, you can figure out the rest in Step 6, where you'll actually set up your Hackintosh with Multibeast. After you're done with the 'Customize' page, install Mountain Lion. This will take at least 30 minutes.
Once again, if you get a kernel panic/loading error when you try to boot your new Mountain Lion installation (or if the installation simply won't start within 10 minutes), you'll need to enter some boot flags. To enter boot flags, manually restart your computer by pressing your computer's power button. Then, once you've booted back into the iAtkos menu, try before pressing the enter/return key. Check out this list of for reference ( PCIRootUID=0 and -x are two popular boot flags). Multibeast Multibeast is a collection of kext files that you'll need to install for your Hackintoshes to have sound, internet, a high resolution screen, and more.
Different Hackintosh builds require different Multibeast setups, though most setups are very similar. If you have a Gigabyte GA-P67A-D3-B3 motherboard like me, check out my own.
Hackintosh.com links to everything you need to build a Hackintosh and get macOS High Sierra (10.13) as well as many earlier versions of Mac OS X running on an unsupported computer --, step-by-step 'how to' guides, and tutorials -- in addition to installation, of compatible computers and parts, and for support. Also enjoy Mac hacks, tweaks, and themes as well as Mac and Hackintosh case mods? For,,, side-by-side, a tool to, an installable and more, see, too. For iPod, iPhone and iPad info, hit.
Want to share Hackintosh.com or save a link for future reading? Options to abound. Hackintosh Instructions & Tutorials Helpful individuals have provided step-by-step 'how to' guides and tutorials as well as general advice on installing OS X on everything from self-built desktop systems and notebooks to netbooks, tablets, and more.
Installation guides for macOS High Sierra (10.13), macOS Sierra (10.12), OS X El Capitan (10.11), and OS X Yosemite (10.10) follow. For older tutorials, see the further below. Be sure to see the Hackintosh, too. The current version of the Mac operating system is macOS 10.13 'High Sierra'. A number of quality tutorials to install this version of the operating system on a PC include: - How to install macOS 10.13 High Sierra on a supported computer from the well-known using the site's own application.
The site has and for building your own system, as well. It covers the macOS 10.3 High Sierra ' and the and updates, too. - How to update to macOS 10.13 High Sierra on any compatible PC using the application, also from.
- How to install macOS 10.13 High Sierra on these high performance motherboards. Includes hardware recommendations, also. - A detailed guide on how to install macOS 10.13 High Sierra on these affordable, highly compatible tower PCs using the app.
- A recently updated guide to install macOS 10.13 High Sierra on this Lenovo notebook using the application. - If the 'official' tutorial isn't enough, this quality tutorial from well-established Mac site may be exactly what you need. The same author also covers the hardware components that he selected for his Hackintosh, which he has named '.' - How to update from one version of macOS High Sierra to another with troubleshooting suggestions if it doesn't go smoothly, also from. - An easy-to-follow tutorial to create a bootable USB installer for macOS High Sierra using the respected app courtesy of. Note that is the same as that came before it, although not all Macs.
For maximum performance, be sure to confirm hardware compatibility with HVEC before buying parts for a new Hackintosh. Although official is the same, you may want to have your Hackintosh run macOS 10.12 'Sierra' for compatibility with specific third-party software like Office for Mac 2011. Quality Hackintosh tutorials for Sierra include: - How to install macOS 10.12 Sierra on any supported PC from the legendary using the site's own application. The site has if the installation does not work properly, as well.
It covers the,,,, and and updates, too. - A short tutorial to upgrade a Hackintosh running OS X El Capitan (10.11) to macOS Sierra (10.12) using the application. - If the 'official' tutorial isn't sufficient, this quality tutorial from the long term Microsoft-focused site also covers how to install macOS Sierra on a PC using Unibeast. - A short tutorial from newcomer that explains how to use the tool to install macOS Sierra. - A in-depth tutorial that covers hardware selection with a focus on video editing as well as macOS Sierra installation. See the below, also.
- A noble effort to write an 'always up-to-date' guide to building a Hackintosh from. Ironically, it is not up-to-date, but it covers hardware selection and construction as well as installing macOS Sierra. - From, the author's personal experience of building a small PC and installing macOS Sierra using other tutorials. - A straightforward tutorial to create a bootable USB installer for macOS Sierra using the well regarded app courtesy of. - A tutorial from that explains how to create a bootable macOS Sierra USB flash drive for a Hackintosh with Terminal and. - A helpful tutorial to build a powerful tower desktop Hackintosh from Dan Counsell. It includes hardware selection and basic software installation alike.
Note that is more limited than that came before it. Be particularly certain to verify compatibility before upgrading an older Hackintosh to this version of the operating system, too. Because is more limited than OS X 10.11 'El Capitan,' you may have hardware that is not compatible with later versions of the macOS but that is compatible with this version. Quality Hackintosh tutorials for El Capitan include: - How to install OS X 10.11 El Capitan on any supported PC from the legendary using the site's own Unibeast 6 software tool. The site has if the installation does not go smoothly, also. It covers the,,,,, and updates, as well.
- A simple tutorial to upgrade directly from OS X Yosemite (10.10) to OS X El Capitan (10.11) using the software tool. - A basic tutorial to install OS X El Capitan (10.11) using the version of the older Chameleon bootloader. - If the 'official' tutorial from tonymacx86 isn't as easy to follow as you would like, you might prefer this installation guide from, which includes step-by-step screenshots of the process. - A step-by-step installation guide with easy-to-follow screenshots also from.
- Another quality tutorial to install OS X El Capitan on a compatible PC from the long term Microsoft-focused site. - A long tutorial to select hardware and install OS X El Capitan as well as a performance evaluation written from the perspective of a designer. - How to install OS X El Capitan and Windows on separate hard drives on your Hackintosh for trouble-free operation.
- A detailed tutorial from that covers how to create a bootable OS X El Capitan USB flash drive for a Hackintosh (or a Mac) using the app. Note that although for OS X 10.11 'El Capitan' is extensive,, such as support for the advanced 'Metal' graphics technology is more limited. If Metal capability (or another particular feature) is of critical interest to you, make sure that it is likely to work with your desired Hackintosh configuration prior to making hardware purchases.
Although official is the same, you may want to have your Hackintosh run OS X 10.10 'Yosemite' for compatibility with specific third-party hardware or software. Quality Hackintosh tutorials for Yosemite include: - How to install OS X 10.10 Yosemite on any supported PC from using the site's own and software tools. For those interested in more detailed understanding of the process, the same site also provides an using. It covers the,,,, and updates, too. - A how to guide to update a Hackintosh running OS X Mavericks to OS X Yosemite from using Unibeast and Multibeast.
And - If the 'official' guide above to installing OS X Yosemite on your PC with tonymacx86's and isn't quite what you would like, try these tutorials from complete with extensive screenshots of the entire installation process. - An OS X 10.10 Yosemite Hackintosh installation guide for beginners from a helpful forum member. Also see the ' from another helpful forum user. Forum postings from ' and ' may be useful, as well.
These tutorials use the bootloader. - This tutorial from provides detailed screenshots to install Niresh's Hackintosh Zone distro with as well as a helpful comparison to other OS X Yosemite installation methods. The same site covers installing the Yosemite Zone distro, as well. - This useful blog post originally from Geek Dime (now offline) covers inexpensive compatible hardware as well as OS X Yosemite installation with the EFI bootloader. - How to install Yosemite on a number of different HP laptops using the UEFI. - An in-depth guide, complete with screen shots, that covers installing both OS X Yosemite and OS X Mavericks on separate drive partitions courtesy of. Note that although for OS X 10.10 'Yosemite' is quite broad, widely.
Although official and even essentially is the same, you still may prefer to have your Hackintosh run OS X 10.9 'Mavericks' whether for software compatibility or simply because you do not like the 'flat' interface design that OS X 'Yosemite' introduced to the platform. Quality Hackintosh tutorials for Mavericks include: - An OS X 10.9 Mavericks Hackintosh installation guide from using the site's UniBeast app. The site also covers the,,,, and updates. - From, a how to installation guide for OS X Mavericks using the sophisticated app. If the 'official' guide (above) isn't sufficient, you also may find this site's OS X Mavericks and its tutorial for the sketchy helpful, too.
- Explains how to install OS X Mavericks, as well as Lion and Mountain Lion, on Gigabyte motherboards using the Hackinstaller script. This tutorial also includes a list of FAQs that can be quite helpful for troubleshooting. - From, explains how to install OS X Mavericks in using the dodgy Niresh distro. - A brief guide to dual boot both OS X Mavericks and Windows 8/8.1 on -based Hackintosh systems using the bootloader program.
- Explains how to upgrade a -based Hackintosh from OS X 10.8.5 Mountain Lion to OS X 10.9 Mavericks using MultiBeast, Chimera, and other apps. - An interesting piece from that covers both the Quo 'Any OS' (AOS) motherboard -- quietly designed to be as compatible as possible with OS X -- and OS X Mavericks installation and configuration. - An archived guide to building a Hackintosh from. Covers hardware selection and construction as well as installing OS X Mavericks. - An tutorial that explains how to create a bootable OS X Mavericks USB flash drive for a Hackintosh (or a Mac) with the excellent. Although hardware compatibility is essentially identical to OS X 10.11 'El Capitan,' OS X 10.10 'Yosemite,' and OS X 10.9 'Mavericks,' Hackintosh installation procedures and tools can be different for OS X 10.8 'Mountain Lion': - A complete OS X 10.8 'Mountain Lion' Hackintosh installation guide from the legendary using the site's UniBeast installation tool.
The site covers the,,,, and updates, too. - An installation guide for OS X 10.8 'Mountain Lion' using the sophisticated app, which has more features than UniBeast and may be of interest accordingly. - If the 'official' tutorial from tonymacx86 wasn't enough, this one from may help. The same site also covers how to of the dodgy and Niresh distros of 'Mountain Lion' as well as how to 'Mountain Lion' in with Hackboot.
- A ten page tutorial covering hardware selection and construction for an inexpensive 'Ivy Bridge' OS X 'Mountain Lion' Hackintosh from. The author also provides shorter tutorials about OS X Mountain Lion and Hackintosh. - Originally written for Mac OS X 10.6 Snow Leopard and subsequently updated to cover OS X 10.8 Mountain Lion and 'Ivy Bridge' motherboards, this twelve page Hackintosh tutorial from is geared toward amateur filmmakers. It covers hardware selection and assembly in addition to OS X installation. - How to install OS X 10.8.5 on a Hackintosh from. Covers hardware selection and construction as well as installing the OS X 'Mountain Lion' software. - A well-written tutorial to upgrade a Hackintosh running OS X 10.7 'Lion' to OS X 10.8 'Mountain Lion' from the excellent.
The same blogger also covers how to on a compatible Gigabyte board. - An interesting article from about OS X 10.8 'Mountain Lion' installation on an HP ProBook 4530 from the perspective of a professional musician -- and 'old school' Mac and Amiga user -- interested in backwards compatibility. Lennie Tristano Transcriptions Pdf File. Significant coverage of emulation environments, too. - A detailed piece to create a bootable OS X 10.8 'Mountain Lion' USB flash drive for a Hackintosh (or a Mac) using the helpful app.
- A tutorial from that covers the process of configuring a Fusion Drive on a 'Mountain Lion' Hackintosh system. - A useful walkthrough from that explains how to install an SSD in an OS X 10.8 'Mountain Lion' Hackintosh that already has a hard drive to significantly enhance performance. Note that just like its predecessor, OS X 10.8 'Mountain Lion' does not support ' and cannot run written for the PowerPC processor. Those who need older software should instead consider Mac OS X 10.6 'Snow Leopard.'
Hackintosh tutorials for OS X 10.7 'Lion' still may be of interest for compatibility with additional hardware, whether system components themselves or third-party peripherals: - The quintessential tutorial to install the download version of OS X 10.7 'Lion' on a PC with compatible hardware using xMove and Multibeast from. The same site also covers upgrading a Hackintosh to,,,, and. - A simple tutorial to install OS X 'Lion' from the retail Apple USB thumb drive on a Hackintosh using the xMove software tool, also from. - A detailed tutorial to install OS X 'Lion' from a bootable USB drive using the UniBeast tool, yet again from.
- A walkthrough from that covers OS X 'Lion' installation using Kakewalk on a supported Gigabyte-based Hackintosh. The site offers a 'Lion' walkthrough for, too. - An insightful and detailed post from photographer. Covers OS X 10.7 'Lion' installation, workarounds, limitations, benchmarks and more.
- A step-by-step post to install OS X Lion on an AMD-based Hackintosh from using the software tool and selected kexts. - A short, but vital, post on upgrading a Mac OS X 10.6 'Snow Leopard' Hackintosh to Mac OS X 10.7 'Lion' via the App Store from the always excellent. - A helpful post on building a 'Hackintosh' Mac mini running Mac OS X 10.7 'Lion' Server. - A short post that explains how to install OS X 10.7 'Lion' on these netbooks from.
Note that Mac OS X 10.7 'Lion' does not support ' and cannot run for the PowerPC processor. Those who need older software should instead consider Mac OS X 10.6 'Snow Leopard.' Hackintosh tutorials for Mac OS X 10.6 'Snow Leopard' can be particularly useful for those who need their Hackintosh to be compatible with written for the PowerPC processor or for those who simply do not like the 'iOS-ification' that OS X Lion brought to the platform: - Written in late 2013, an up-to-date and easy-to-follow guide covering hardware configuration and Mac OS X installation for a Snow Leopard Hackintosh from. - An excellent guide to installing Mac OS X 10.6 'Snow Leopard' from. The same blogger also offers an older step-by-step guide to a Hackintosh to Mac OS X 10.6 'Snow Leopard' from Mac OS X 10.5.8 'Leopard'.
Bassheadtech likewise covers upgrading a Hackintosh to,,,, and. - Straightforward instructions using the iBoot and MultiBeast tools from. The same site also helps one upgrade a Hackintosh to,,,, and finally with useful blog posts. - From, an 'experimental' guide to installing Mac OS X 10.6 'Snow Leopard' on an 'Ivy Bridge' Hackintosh with the iBoot Ivy Bridge software tool.
The same site also provides a guide to on an older 'Sandy Bridge' system. - A six page guide to installing Mac OS X 10.6 'Snow Leopard' on a custom-built 'Sandy Bridge' Hackintosh from. Uses the iBoot Legacy and Multibeast applications.
- An insightful evaluation of a personal experience building a Hackintosh and a comparison of the resulting Hackintosh to a from. - An older Mac OS X 10.6 'Snow Leopard' installation process on a Hackintosh as well as custom details related to using an AMD-based system from. The same site also offers a list of that may be helpful. - A guide to install Mac OS X 10.6 'Snow Leopard' in VMWARE for Windows 7, also from.,, and - Detailed and easy-to-follow from. - Another great walkthrough for Snow Leopard on this largely compatible netbook courtesy of. - An older walkthrough from the blog for the 'ultimate Snow Leopard netbook'.
For Hackintosh 'case mod' tutorials -- which cover hardware construction and modification rather than software installation -- be sure to also see. In addition to collections of Macintosh and Hackintosh case mods, MacHacks.com covers Mac OS X hacks, tweaks, and themes as well. Hackintosh Compatible Computers, Parts & Drivers You can't just install OS X on any old PC and expect it to work like it does on a Mac. Let's face it, given the vast assortment of configurations, you can't install Windows on any old PC and expect it to work like OS X does on a Mac. Fortunately, many have experimented with Mac OS X on a wide variety of PC hardware and have shared their findings with the world.
The following listings of Hackintosh compatible computers, parts, motherboards and drivers (kexts) should be helpful: - The original wiki that lists desktop and notebook computers, as well as parts, that are compatible with a variety of versions of Mac OS X. - A database of 'Differentiated System Description Tables' to make many motherboards from Asrock, ASUS, EVGA, Gigabyte, Intel and MSI 'aware' of Mac OS X.
In turn, this is promised to make it possible for the operating system to 'utilize more of your hardware' -- from (registration required). - A database of official and unofficial Mac OS X drivers (kexts) from the Dutch Hackintosh community. - A well-researched article on top notebooks from Acer, Asus, HP, and Lenovo that are largely compatible with OS X El Capitan. - A listing of select notebooks from Acer, Dell, HP, and Lenovo that are mostly compatible with OS X Mavericks courtesy of. - This Mac OS X 10.6 Snow Leopard compatibility chart of dozens of netbooks from can be particularly useful for those interested in 'legacy' Mac OS X use. Hackintosh Support Communities There are a number of vibrant and active communities that focus on helping one another to configure, build, and troubleshoot Hackintosh systems. Free Download Audio Driver For Windows 7 Ultimate 64 Bit more. Notable Hackintosh communities such as the following may be useful to you: Before posting a message in any of these forums, it always is good form to first search and see whether or not your question has been addressed previously.
Those who do not do so can expect to be dismissed as 'noobs' or ignored. Hackintosh Installation & Usability Videos The following videos demonstrate the installation process of macOS High Sierra (10.13), macOS Sierra (10.12), OS X El Capitan (10.11), and OS X Yosemite (10.10) on PC hardware.
For older versions of the Mac operating system, see the further below.